Hunting and Wildlife Magazine - Issue 227 - Summer 2025
Words By: Hugh Devereux-Mack
Like many hunters, my story began with my father introducing me to a .22 when I was six years old, plinking swinging steel rabbits in our backyard. This early experience laid the foundation for my hunting journey, which gradually expanded to include rabbits, hares, goats, and recently, deer.
During my time at college, I had the chance to secure my first deer. However, lacking the farmer’s permission to shoot anything other than goats and pigs, all I could do was line up my sights on a mob of eight deer and quietly say, ‘Bang’. Although the ethical choice, this missed opportunity lingered in my memory, as it would be several years before I had another chance at a deer. Despite this, my love for shooting sports continued to flourish, with sporting clays, skeet, and duck shooting being areas in which I had some natural talent.
While I enjoyed hunting with a rifle, the technical aspects of setup and ballistics never captured my interest. Although my father spent hours reloading and reading books on ballistics, they just didn’t appeal. As such, I was content with a more straightforward approach: head to the range, sight in at 200 yards, and that was it. If my target was outside 200 yards, I’d stalk it until I was within range, then squeeze the trigger. It was a simple way of hunting and what I had been taught. A range finder wasn’t even in the toolkit back then.
It wasn't until more than a decade later, at the COLFO 25th Anniversary event, that my eyes were opened to the full potential of the rifle I carried when the team at Sparrow Hawk Range guided me in engaging a target, firstly 1km away and then a mile. Although that was an extreme case, it sparked a curiosity that I will explore over the course of this article series. How much has technology changed in the last decade? What am I capable of? And what do I need to know to hunt confidently and ethically beyond 300m and get on steel beyond 500m?
Goal of the series
On the recent NZDA Promotional Tahr Hunt, I spoke with Ivan Pavich, the Hunting & Wildlife Magazine Editor, and other experienced hunters to start the journey. Together, we came up with the idea of a series of articles to help non-technical hunters or recent HUNTS Programme graduates take the next step in their hunting journey. I wanted to document my experiences learning this new skill set, providing a roadmap and helping others should they also wish to learn more about the technology and capabilities of their hunting rifles.
As such, this series will cover essential topics such as gear selection, rifle setup, MRAD vs. MOA, creating a ballistic chart for your rifle, using turreted scopes, mobile ballistics apps
and finally, either a hunt or long-range range day. I’ll also be documenting the mistakes that I make along the way as someone new to this level of our sport and hope that, overall, it’ll spark your curiosity and perhaps entertain the experts who remember their own beginnings.
Equipment breakdown and reason for selection
To ensure full transparency, I’d like to acknowledge the support from the team at Swarovski Optik, who, upon learning about this series, generously offered to loan me equipment to
aid in its creation. No financial transactions were involved, and my accounts of using their products will be entirely based on my honest experiences.
Rifle
My current hunting rifle is a rebuilt 1909 Mauser ’98 with a Timney trigger and modern Douglas Premium 19-inch barrel chambered in .308 Winchester.
Although it holds a special place in my gun safe as it was my 16th birthday present from Dad, it is a very specific setup, so writing a piece based on this wouldn’t be relevant to most hunters.
To ensure a broader appeal and applicability, I decided to purchase a left-handed Tikka T3x Lite Veil, also chambered in .308 Win. The reason I went with the Tikka is because they are one of the most popular hunting rifles in New Zealand and are relatively well-priced (especially if you pick one up second-hand). The bare rifle weighs sub 7lbs (3.18kg), so it is light enough to carry on long days, but having tried a superlight Tikka in .308, my concerns about the recoil proved to be inconsequential. They also come with a three-shot 1-MOA guarantee, so I could mitigate the new shooter mistakes that might affect a rifle setup.
Calibre
Calibre selection is one of the most hotly-debated topics in both clubrooms and internet forums. When learning long-range shooting, there are some obvious cartridges such as the sparkly 6.5 Creedmoor, 7mm Rem Mag, the versatile .270 and an infinite list of others.
But for me, the choice was relatively simple. I wanted a do-anything, for-sale-everywhere, cost-effective, and proven cartridge to maximise the relevance for everyone. I chose the .308 Winchester for all those reasons and one more: I like it. I appreciate the balance that the .308 offers - it shoots flat enough, hits hard enough, and provides sufficient terminal performance to handle any big-game animal in New Zealand at the distances I’ll be shooting. Its recoil is manageable for most shooters, and you can find its ammunition almost anywhere – usually, there are more factory .308 loads available than for other cartridges.
Scope
Glass selection for this challenge was made easier because I was working with Swarovski Optik to secure prizes for our NZDA Photo Competition and the NZDA Promo Hunt. When discussing other projects, I mentioned I wanted to learn more about hunting at variable ranges but had only just started looking at the new glass and technology that had developed since I started a decade ago.
Swarovski Optik, an Austrian company that started in 1895, initially focused on cutting crystals and precision grinding jewels. Over the decades, their expertise evolved from grinding jewels to grinding lenses, eventually leading to the production of riflescopes in 1959. This transition marked the beginning of Swarovski's journey into the optics industry, where they have become a market leader renowned for their precision and quality.
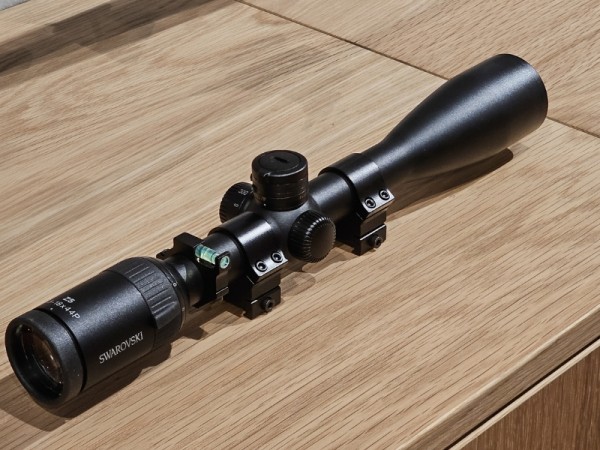
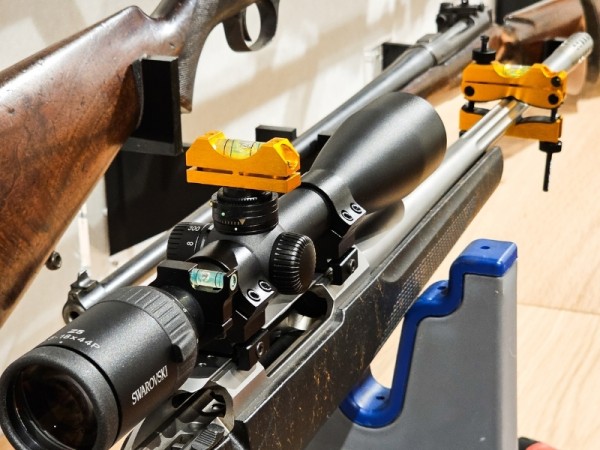
When JP at Swarovski Optik offered to loan me their Z5 3.5-18x44mm BT scope for the purpose of this article, I accepted. This scope boasts a user-friendly turret system designed to meet the needs of most hunters. This scope includes an elevation turret with a zero stop, simplifying the process of adjusting for different target distances. Additionally, the Z5 features three adjustable, colour-coded rings for quick and accurate distance settings, making it practical for hunters who prefer not to use ballistic apps.
To me, it seemed like a clever piece of engineering that was simple but effective, ensuring that both novice and experienced users could put it to use. At a price point of around $2,400 NZD, it is not a cheap scope. However, it is one that I would personally invest in given that I run a minimalist approach when it comes to my shooting, so I won’t ever be running multiple setups (famous last words). Although initially, I found the coloured ring system attractive, in the field, it was less practical because the elevations I was hunting at were different to the location I was sighting in my rifle, and the angle of shots meant that the range wasn’t always accurate to the click references set by the coloured rings. As such, I adapted them in the field to mark every 10 clicks more clearly and relied on the reading provided by my range-finder binoculars. The scope is also limited to around 56 clicks or 14 MOA with the factory turret to adjust for range, which, although fine for hunting, would fall short of the needs of a long-range shooter without swapping to a custom turret.
Binoculars
Alongside the scope, Swarovski also provided a pair of their EL Range 10x32 range-finding binoculars. The binos connect to the Swarovski EL Range mobile app that when loaded with ballistic data from the rifle and scope, can give precise click counts for each target.
The glass was clear, as can be expected, and the technology inside the device was very easy to use, though reading the instruction manual is very helpful to get the most out of this gear. In first light, I did struggle with acquiring a small, well-camouflaged sika; however, that may also have been an issue with my eyes more than anything else. The combination of a range finder and binoculars was very valuable, given I wear glasses to hunt, and it was one less thing to manage. The fact that it then gave me the required clicks gave me more confidence in my rifle when squeezing the trigger.
Swarovski mobile apps
The Swarovski EL Range Configurator made the setup of the binoculars easy and allowed me to take full advantage of the tools contained within the binos. The app did, however, struggle when I was updating the location to account for the local elevation because I did not have phone reception. In future, I’ll look to set that up on the internal map prior to leaving to ensure that I’m working with the most accurate information available. The ballistics programme was also simple to use and allowed information for up to three rifles to be loaded, so those running multiple setups might find it useful. I did find it interesting that these two apps did not talk to each other to share setup data and location, but perhaps that will come in future.
Other equipment
When looking at the equipment to set up a rifle, the first thing that struck me was how much basic tools like a torque wrench and spirit level cost when you purchase them from New Zealand retailers. As a result, I turned to the internet. Happily, I found an adjustable torque wrench for just $65 new (instead of $200) and a 2-piece reticle level kit (one piece for the action and one barrel clamp) for just $20 delivered, which was a massive difference to the $149 local retail price. I also picked up a digital caliper to ensure my measurements were accurate when imputing data to the ballistic apps. Although online retailers like Temu do have their issues, having received these products and tested them, the savings of over $260 make them an attractive option for budget-conscious customers.
A torque wrench is important because when you’ve spent thousands of dollars on a new scope, the last thing you want to do is guestimate how tightly you have secured your rings. Too much could damage the sensitive glass and tube assembly; if it is too loose, your scope may lose its zero. With improper tools, you also run the risk of stripping screws or even damaging your mounting surface. The catch is that the difference between ‘just right’ and ‘this is going to break’ is often very little. Unless you are truly gifted, reliably distinguishing between 12, 15, and 18 in/lbs by hand just isn’t going to happen.
Another reason that torque drivers are important is consistency. As many of my podcast guests have said, consistency leads to accuracy. If you want to make sure that all of your mount and action screws are torqued the same way each and every time, then this is the only way to do it.
Setup
There are many good YouTube videos on how best to set up your rifle, and I recommend watching them. I found “How to Mount a Scope the Right Way” by Paramount Tactical to be particularly helpful. The key things I learned included the importance of having access to a rifle clamp to secure your rifle as you mount the scope, a level kit, and a torque wrench. The rest was a lesson in patience, aligning the scope and securing the rings equally along their diagonals while checking that the scope and rifle remained level.
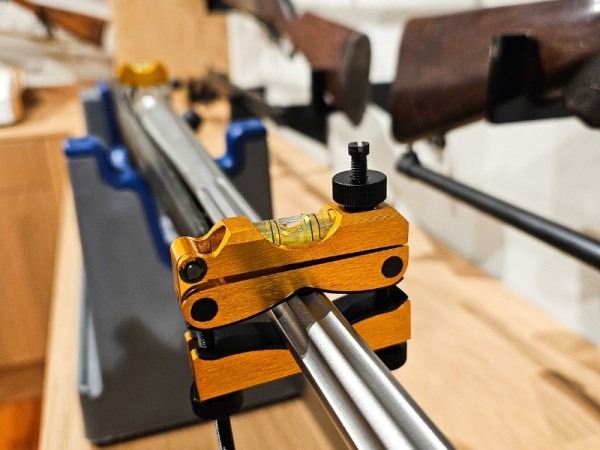
A scope levelling kit like the one pictured ensures that your scope is accurately aligned by establishing that the rifle is level. My kit has a magnetised level that sits above the action and on top of the scope, and a secondary piece that attaches to the barrel, which means that if the rifle should move during assembly, you can easily relevel it. Personally, I followed the advice that suggested that instead of putting the bubble dead centre on the rifle barrel, I micro-adjusted it so that when the rifle was perfectly level, the bubble touched one of the lines. Although a small detail, I found it helped me maintain consistency when compared to eyeballing whether the bubble was in the middle or not.
The first range day zeroing my rifle was nothing remarkable, though the two-shot zero technique was a neat trick. This is the practice of aiming one shot at the centre of a target and firing one shot. Then, with a steady platform for the rifle, you aim the rifle at the hole in the paper and, without moving the rifle, dial in your scope until the crosshairs are at the centre of the target. Then fire a second shot at the centre to verify you’re on target. The NZDA now has sighting in targets available from the online shop, which can help with accurate click measurements for both MOA and MRAD scopes. I did realise that shooting off my hunting bipod to sight in wasn’t the best option, so I borrowed a sled from another club member as well as a chronograph to get my bullet speed for the ballistic data.
Early lessons
I expected to learn a lot from this process and knew mistakes were inevitable, but I didn’t expect them to come so quickly. The first lesson came when I excitedly sat down to install the scope on the Tikka and realised that Picatinny rails, something I thought to be standard, were not, in fact, standard across all rifle platforms. Although this may seem obvious to those who have set up rifles before, for someone who has used pre-built setups, it’s a small detail that is easily overlooked.
I also learned that not all advice you read or have inherited is valid. Growing up, I distinctly remember my father saying, “There’s no point suppressing a .308 because you’ll only ever get one shot, and it won’t stop the supersonic crack”. Having now suppressed my .308, I can confirm suppressors are fantastic. It not only soaked a lot of recoil but also prevented the percussion wave I’d grown up with shooting a short barrel .308. It also taught me that if you follow internet instructions and use blue Loctite to secure your muzzle break because, “I’ll never suppress my rifle”, the simplest way to break the bond is boiling water, then using a rod to twist the muzzle break off. When my partner asked what I was doing, I told her I was cooking American Chilli and needed to add ‘Freedom’.
Read Hunting & Wildlife Magazine
NZDA members receive an electronic version by email, and can access it on the NZDA app. Subscriptions and physical copies can be purchased online. Visit the NZDA Shop at www.nzda.shop
Missed an issue?
We make our older editions free to read online. Browse the back catalogue here.
Write for Hunting and Wildlife

Join NZDA To Help Us Advocate on Your Behalf